Heat Treatment Oven
I wanted to be able to heat treat parts with a good level of accuracy rather than the old heat with a blow torch and quench method. After looking at the cost to buy a ready made solution I decided I would have a go at making one..jpg)
The initial requirement was to be able to heat treat steel to 1300 to 1400 decrees C. This would allow me to treat most metals I'm likely to come across as well as smelting and casting some lower melting point metals.
The limiting factors of size and power consumption where the first things to consider. Ideally I wanted 18" deep by 6" square.
I also wanted to be able to stand the oven vertically or horizontally.
The main frame was made from angle iron and square tube I had lying around, the other main parts with approx. prices are listed below.
| 15mm Stove Rope Door Seal & Glue | £11.00 |
| Mains Rocker Switch On Off DPST Red 16A 240v / 250V 10A operating | £4.00 |
| Limit Switch IP65 actuator adjustable: roller arm rod spring coil button NC NO | £11.00 |
| 12MM PANEL NEON LAMP / BULB INDICATOR CHROME BEZEL RED GREEN AMBER 240V SPARES. | £3.50 |
| Kanthal A1 resistance heating wire FeCrAl | £50.00 |
| Insulating Fire Bricks-Vitcas Grade 23 (x 35) | £70.00 |
| Silcas M-White Refractory Mortar | £30.00 |
| K Type High Temperature Thermocouple Sensor for Ceramic Kiln Furnace | £9.00 |
| Angle Iron & Square Tube | £- |
| PID Controller + SSR + Heat Sink | £40.00 |
| SSR | £10.00 |
| Heat Sink | £10.00 |
| Heat Shrink, Cable, Plug | £30.00 |
| Total | £278.50 |
Cutting the Fire
Bricks
These bricks are easily cut with a saw, knife, router etc. If you want to limit the amount of dust produced then soak the bricks in water first.
The design concept I used was the least cutting the better.
These bricks are easily cut with a saw, knife, router etc. If you want to limit the amount of dust produced then soak the bricks in water first.
The design concept I used was the least cutting the better.
.jpg)
.jpg)
.jpg)
.jpg)
.jpg)
.jpg)
.jpg)
.jpg)
Coil Making
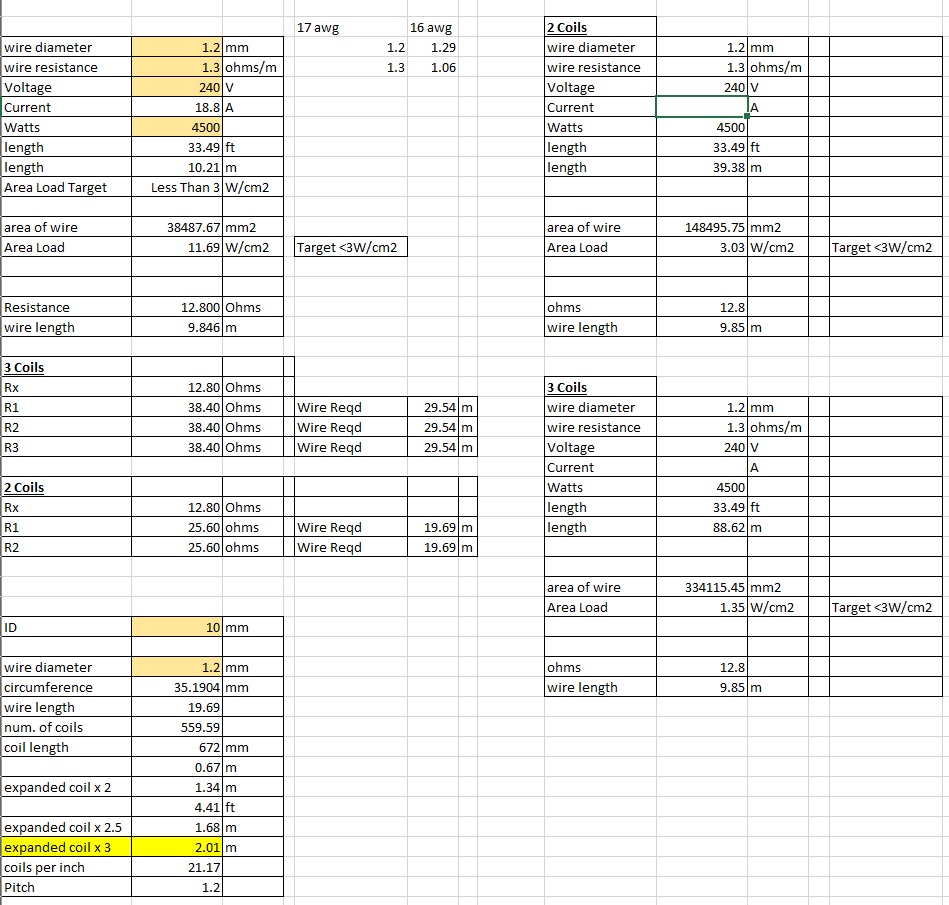
I spent a lot of time investigating the correct coil dimensions and power ratings. Luckily there are plenty of others that have already documented the requirements although it does depend on what wire you can buy and the power supply you have.
I have a 32A supply but the largest diameter Kanthal A1 wire I could source was 17awg or 1.2mm diameter in 20m lengths. I used two 20m lengths.
After working through the numbers I ended up with 2 coils wrapped around a 10mm diameter rod. Each coil was stretched to 2m so I could get the 4 rows needed each side of the oven.
With the coils wired in parallel and an 18.8A current, I ended up with a 4.5KW heater which is more than comparable to what's commercially available.
The coils were produced on my lathe running with a feed
rate to match the 1.2mm wire diameter.
.jpg)
.jpg)
.jpg)
.jpg)
.jpg)
.jpg)
.jpg)
.jpg)
.jpg)
.jpg)
.jpg)
.jpg)
.jpg)
Frame Making
This was made from old racking angle iron and some square tube. There were no drawings as such as it was made up as I went along.
The beauty of the frame is it all bolts together so I can change fire bricks when needed and could also make a deeper oven using the same frame and longer studding if required.
.jpg)
.jpg)
.jpg)
.jpg)
The powder coating oven comes in handy again. See build
project for more details.
.jpg)
.jpg)
.jpg)
.jpg)
.jpg)
Control Box
I had this welded box with lid I made 30+ years ago. I can't even remember why I made it and its never been used so time to make it useful.
I had this welded box with lid I made 30+ years ago. I can't even remember why I made it and its never been used so time to make it useful.
.jpg)
.jpg)
.jpg)
.jpg)
Plugs for the coil wire outlets
.jpg)
.jpg)
.jpg)
.jpg)
.jpg)
.jpg)
.jpg)
.jpg)
.jpg)
.jpg)
Fitting the rope door and rear seals
.jpg)
.jpg)
.jpg)
.jpg)
.jpg)
Finished assembly with heat cycyle to 800 degrees C
.jpg)
.jpg)
.jpg)
.jpg)
.jpg)
.jpg)
.jpg)
.jpg)
.jpg)
.jpg)
.jpg)
.jpg)
